What are Stocktakes?
A Stocktake involves counting and verifying all parts within a location to ensure that the recorded stock levels are accurate and match the expected inventory. This process helps in maintaining correct stock records and identifying discrepancies between physical stock and recorded quantities.
Permissions
This area requires a Service or Finance license to access.
Users, Super Users, Owners and Internal Users can view and update the data within this area.
Creating a New Stocktake
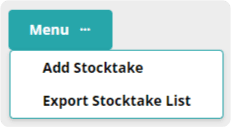
To create a new stocktake in SmartVend, select ‘Menu’, then choose ‘Add Stocktake’.

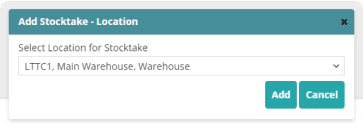
After selecting ‘Add Stocktake’, you will be prompted to search for a location by either Location Reference or Name. Once you've found the correct location, simply select it and click ‘Add’ to proceed with the stocktake.

Stocktake Details
When creating a new stocktake in the Stocktake Details page, if the location has a large number of parts, you can use filters to narrow the part list to individual items. The table will update based on the applied filters.
Initially, the counted quantity of all parts will be set to the expected quantity. To hide parts with a counted quantity of 0, you can deselect the option "Include a Expected Quantity of 0" This will ensure only parts with an expected quantity are displayed.
You have the option to amend the Stocktake Reference to something more relevant to your organisation, or you can keep the automatically generated reference if it suits your needs. This allows for greater flexibility in tracking stocktakes based on your internal naming conventions.
Within the part table, each product will be listed with the Delivered Quantity defaulted to 0. You can enter the quantity counted in both Cases and Singles, and record any Wastage for each part.
When you enter wastage quantities in either cases or singles during a Stocktake, you must select a Wastage Reason from the dropdown menu. This dropdown will contain reasons that were previously set up in Administration under Administration → Stock → Wastage Reasons.
This selection ensures that all wastage is recorded with a valid reason, which can be helpful for reporting and auditing purposes.

If you amend a field, the corresponding row will highlight in blue to indicate that there are unsaved changes.

Quick Tip
The Expected Quantity in a Stocktake reflects the current stock level of the part at the time the Stocktake is created. If any Stock Transfers, Stocktakes, or Visits are completed before the Stocktake is submitted, you should:
Save the Stocktake: Ensure that any progress is saved to avoid losing data.
Refresh the Page: After saving, refresh the page to update the Stocktake with the most current values.
This process ensures that the Stocktake reflects the latest stock levels and is accurate.
Cost and Retail Valuation
Within the Stocktake details, you can view both the Cost Valuation and Retail Valuation for each part.

Cost Valuation: This represents the amount your organisation paid to acquire the part. It reflects the cost price of the part, including any purchase costs or expenses associated with obtaining it.
Retail Valuation: This represents the potential selling price of the part. It indicates how much you could sell the partfor, based on its recommended retail price (RRP) or current selling price.
These valuations help in assessing both the investment in stock and the potential revenue that can be generated from it.

The Cost Variance Valuation and Retail Variance Valuation reflect the differences between the actual stock quantities counted and the expected quantities. Here’s what each valuation represents:
Cost Variance Valuation: This shows the difference in cost valuation between the counted quantity and the expected quantity. It calculates the monetary impact of discrepancies in the stock levels based on the cost price of the parts.
Retail Variance Valuation: This displays the difference in retail valuation between the counted quantity and the expected quantity. It calculates the potential revenue impact of discrepancies in stock levels based on the retail price of the parts.
These valuations help in assessing the financial impact of stock discrepancies and are useful for inventory management and financial reporting.
Save Stocktake
If you need to navigate away from the stocktake page while entering values, make sure to select "Save Changes" to ensure your updates are preserved.

Saving your changes ensures that your entered details are retained, allowing you to pick up right where you left off when you return to complete the stocktake.
Submit Stocktake
To finalise and submit the stocktake:
Review Values: Ensure all quantities and valuations are correctly entered.
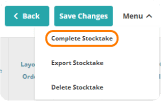
Complete Stocktake: Navigate to the ‘Menu’ and select ‘Complete Stocktake’.
This action will submit the stocktake and update the system accordingly.

Delete Stocktake
If you need to cancel and remove a stocktake that you no longer wish to submit:
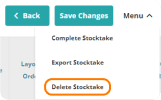
Navigate to Menu: Click on the ‘Menu’ option.
Select Delete Stocktake: Choose ‘Delete Stocktake’ to remove the stocktake from the system.

When you select Delete Stocktake:
Confirm Deletion: A prompt will appear asking you to confirm that you are about to delete the stocktake.
Select ‘Yes’: Confirm your decision by selecting ‘Yes’. This will permanently delete the stocktake and any unsaved changes.

Quick Tip
Once a Stocktake is marked as “Completed,” it’s finalised, and you cannot make any changes to the values entered. If you discover errors or discrepancies after submission, you should:
Create a New Stocktake: Initiate a new Stocktake for the same location.
Enter the Correct Values: Input the accurate stock levels in the new Stocktake.
This process ensures that stock records are corrected without altering the historical data of completed Stocktakes.
Edit Stocktake
If you need to edit an uncompleted Stocktake:
Select ‘Edit’: Locate the Stocktake you wish to amend and click on the ‘Edit’ option.
Modify Values: Make the necessary changes to the quantities or other details.
Save Changes: Ensure to save any updates to keep the Stocktake accurate.
This allows you to make adjustments before the Stocktake is finalised.

‘Incomplete’ Stocktakes
In SmartVend, you can manage how Stocktakes from the app are processed using the ‘Auto-Complete Stocktakes from App’ setting:
Enabled Setting: All Stocktakes submitted via the app will be automatically completed without review. This is ideal for faster processing if you trust the app data.
Disabled Setting: All Stocktakes sent from the app will initially be marked as ‘Incomplete’. This allows for review and amendments before finalising the Stocktake.
To change this setting, contact the customer experience team. Note that this adjustment affects all users within the organisation and is tailored to your specific needs.
When managing an Incomplete Stocktake in SmartVend:
Select ‘Edit’: This allows you to view and amend the Stocktake details.
Amend Values: You can adjust the Counted Quantity and Wasted Quantity for both cases and singles if you identify any errors during your review.
Save Changes: If you need more time to review or make further changes, select ‘Save Changes’ to preserve your progress and return to the Stocktake later.
Complete: When you are satisfied with the Stocktake details, select ‘Complete’ to finalise it.
Delete: If the Stocktake is no longer needed or has significant errors, you can choose ‘Delete’ to remove it.
After marking the Stocktake as completed, the Completed By and Date Completed fields will update with the user who finalised the Stocktake and the date it was completed.


