What are Service Visits?
A service visit involves an operator or engineer performing maintenance or repairs on machines. These visits can be either scheduled (part of a regular maintenance plan) or unscheduled (to address unexpected issues).
Permissions
While there are no restrictions on who can maintain and update, you will need a Service or Finance license to complete service visits.
Completing the Ticket Section
In the Tickets section of a service visit, you can:
View Assigned Tickets: See all tickets that have been assigned to the visit and need to be resolved.
Check Latest Comments: Review the latest comment associated with each ticket, which may provide additional details about the fault or issue that needs to be addressed.
This section helps ensure that all relevant issues are addressed and resolved during the service visit.
When you select ‘Close Ticket’, you will be prompted to:
Confirm the Fault: You can select the specific fault that caused the ticket. This field is optional but helps in documenting the issue for reporting purposes.
Select the Resolution Code: Choose the code that best describes the resolution of the issue. This field is also optional but provides valuable data for reporting and analysis.
Note: Fault Codes and Resolution Codes are set up in the Administration section under Operations.
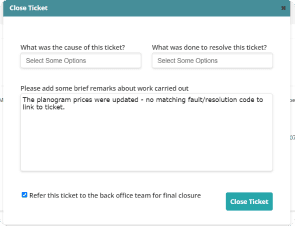
When closing a ticket, you must:
Enter Notes: This section is mandatory, so you need to include text describing the details or outcome of the ticket.
Refer to Back Office Team (if applicable): If the option is enabled in your system settings (Manage Account → System Configuration → Ticket Dashboard Settings → ‘Enable Ticket Final Closure Referral’), you can select “Refer this ticket to the back office team for final closure”. This will mark the ticket as Completed and notify the back office team for final review.
Note: The option to refer the ticket to the back office team will only be available if this feature is enabled in your system configuration.
Completing the Part Action Section
To record parts used during a service visit, follow these steps:
Select “Add Part Action”: This option will allow you to add details about the parts used.
Used Parts
If a part is used but not installed or replacing another part in the machine, you should record it as a ‘Used’ part. Here's how you can do this:
Select “Add Part Action”:
In the service visit details, navigate to the section where you can add part actions.
Choose ‘Used’ Action:
Select the option for ‘Used’ to indicate that you have used equipment
Enter Part Details:
Part Name: Specify the part that was used.
Quantity Used: Enter the number of units of the part that were used.
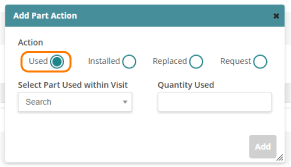
Select “Add”: Ensure you add the entry to update the visit sheet with this information.
Recording parts as ‘Used’ helps in maintaining accurate inventory records and tracking parts that are consumed but not directly installed or replaced in the machine.
Installed Parts
To record a part that has been installed during a service visit, follow these steps:
Select “Add Part Action”:
In the service visit details, navigate to the section where you can add part actions.
Choose ‘Installed’ Action:
Select the option for ‘Installed’ to indicate that you have used equipment
Enter Part Details:
Part Name: Specify the part that was installed.
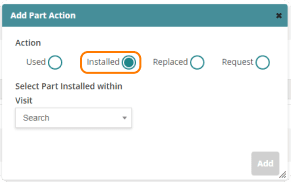
Select “Add”: Ensure you add the entry to update the visit sheet with this information.
Recording parts as ‘Installed’ ensures accurate documentation of parts that have been fitted to the machine, helping in inventory management and maintenance tracking.
Quick Tip
For a part to appear in the 'Used' and 'Installed' searches within a service visit, it must be listed in the stock location's inventory.
Replaced Parts
When you replace an existing part with a new piece of equipment during a service visit, you should use the ‘Replaced’ action to accurately record this replacement. Here’s how to do it:
1. Select “Add Part Action”:
In the service visit details, navigate to the section where you can add part actions.
Choose ‘Replaced’ Action:
Select the option for ‘Replaced’ to indicate that you are replacing an existing part with a new one.
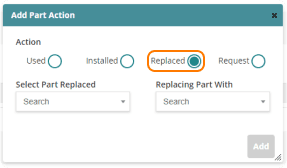
Record Details:
Old Part: Specify the part being replaced. This ensures there is a clear record of what was removed.
New Part: Enter details of the new part that is being installed.
Select “Add”: Ensure you add the entry to update the visit sheet with this information.
By recording part replacements accurately, you maintain a comprehensive history of equipment changes and ensure proper inventory management.
Request Parts
To request a part that is required during a service visit but is not available at the stock location, follow these steps:
Select “Add Part Action”:
In the service visit details, go to the section for adding part actions.
Search for the Part:
Use the search function to find the part you need from the organisation's part list. This list includes all available parts, even those that may not be frequently used.
Specify the Action Type:
Indicate whether the part is needed for installation or if it will be used in some other capacity. This helps in understanding the purpose of the part request.
Request the Part:
If the part is not available at the current stock location, the system may prompt you to request the part. Confirm the request to initiate the process of acquiring the part.
Select “Add”:
Ensure you add the entry to update the visit sheet with this information.
By following these steps, you ensure that any required parts are requested and managed efficiently, minimising delays in completing the service visit.
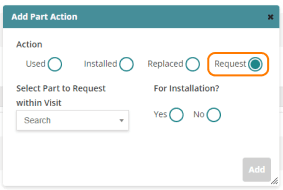
When requesting a part and you select “No” for the "For Installation" option, you will need to:
Confirm the Quantity:
Enter the quantity of the part you need. Ensure that the quantity is greater than 0, as entering 0 is not allowed.
Part Actions Table
In the Part Actions table, you will be able to view:
Action Taken: This indicates what was done with the part (Used, Installed, Replaced, or Requested).
Part Reference: The unique identifier for the part.
Part Name: The name of the part for quick identification.
Available in Stock:
As you add actions for parts, the “Available in Stock” field will update to reflect the remaining stock.
If the stock level for any part reaches 0, the submission of the visit will be disabled. A yellow notification icon will be displayed next to the part row to alert you to the low stock.
This system ensures that you are aware of stock levels and prevents submission of the visit if required parts are out of stock, which helps in maintaining accurate inventory and ensuring all necessary parts are available for completion of service tasks.
Completing the Notes Section
In the Notes section of the visit sheet, you can capture any specific details or observations related to the visit. This might include:
Observations: Any noteworthy findings during the visit.
Instructions: Additional instructions or details relevant to the service performed.
Recommendations: Suggestions for future maintenance or parts replacement.
Customer Feedback: Any feedback from the customer or machine operator.
These notes are crucial for maintaining comprehensive records of each visit and ensuring that all relevant information is documented for future reference or follow-up.


