What is the Route List?
The Route List offers a comprehensive view of all scheduled routes and their associated visits. This feature allows for easy access and adjustments, enabling organisations to proactively manage their machine maintenance and optimise operational efficiency.
Permissions
This area requires a Planning or Finance license to access.
While there are no restrictions on who can maintain and update the Route List, you will need a Stock license to raise stock visits and a Service license to raise service visits.
Quick Tip
The Route List automatically refreshes every two minutes, which will provide an almost up-to-date reflection of the current status of the visits.
Viewing a Route
On the left-hand side of the Route List screen, you have a side panel that displays the scheduled date of the route and the operator assigned to visit the machines. By selecting a name within this panel, you can drill down into the Route details.
This action populates the main table with a list of the scheduled visits for the selected route. At the top of the table, you can see:
The total number of visits included in the selected route.
The order of these visits.
The number of visits created off-route through the app.
Additionally, the top summary bar provides an overview of the route's progress, including:
The number of visits cancelled.
The number of visits completed.
These details are displayed as a percentage of completion.
If you prefer a visual representation of the route, you can select “View Route in Estate Map”. This will direct you to the Estate Map with the selected route loaded, allowing you to see the route's geographical layout.
To view the pick-list for the route and understand what stock is required, select “View Picklist”. This will bring you to the pick-list for that route, detailing the stock items needed.
Note: To rearrange the order of visits within the route, you can drag and drop them. However, you cannot move visits that have a status of ‘Cancelled’, ‘Completed’, ‘Accepted’, or ‘Carried Over’.
Quick Tip
If the route has not had a picklist generated yet, it will automatically generate one at 2 AM on the scheduled day.
If you are viewing a future route and select “View Picklist”, you will be prompted to “pick” the route. Choosing “Cancel” will keep you on the Route List, while selecting “Continue” will generate the picklist for that route immediately.
Quick Tip
Visits with a Service Fill Ticket Type will carry over to the assigned operator's schedule and will not move to the Action Required list. These visits will remain on the operator's route, updating to the current day until they are either completed or reassigned.
Adding a Visit to a Route
To add a visit to a route in SmartVend:
Select "Menu" and then choose "Add Visit" or "Add Visit to Selected Route".
Note that "Add Visit to Selected Route" is only available if a route has been selected prior to clicking "Menu".
Search for the Machine:
Use the search bar to find a machine by machine name, machine reference, telemetry serial, machine serial, site name, or site reference.
Click "Next" after performing your search.
For Stock Visits:
Set the Visit Type to "Stock"
Select the Operator who will handle the visit.
Choose any Mandatory Actions that need to be completed during the visit.
Note: If using machine/location templates instead of planograms, do not select products as mandatory, as this would require operators to enter values for all products.
Enter the Duration expected for the visit.
Select any Tickets that should be resolved during the visit.
Input the Scheduled Date for the visit.
Add any relevant Notes.
Click "Add Visit".
For Service Visits:
Set the Visit Type to "Service".
Select the Operator assigned to the visit.
Enter the Scheduled Date for the visit.
Choose any Tickets that need resolution during the visit.
Add any relevant Notes.
Click "Add Visit".
For Ad-hoc Visits:
Set the Visit Type to "Ad-hoc".
Select the Operator who will handle the visit.
Enter the Scheduled Date for the visit.
Add any relevant Notes.
Click "Add Visit".
Quick Tip
Here's a summary of the different types of visits and their requirements:
Stock Visit:
Purpose: To load products into the machine.
License Required: Stock license.
Service Visit:
Purpose: To resolve machine issues.
License Required: Service license.
Location Visit:
Purpose: To track an operator returning to a location during their route.
License Required: Planning license.
Ad-hoc Visit:
Purpose: A basic visit not covered by other visit types.
License Required: Planning license.
Adding a Location Visit to a Route
To add a Location Visit to a Route, follow these steps:
Select a Route: Ensure you have a Route selected that you want to add the Location Visit to.
Open the Menu: Click on “Menu” and then select ‘Add Location to Selected Route’.
Search for the Location: Use the search bar to find the Location by Name or Reference.
Add the Location Visit: Click “Next” to add the Location Visit to the selected Route.
This will incorporate the Location Visit into your route schedule.
Quick Tip
When adding a visit to a route:
If a Route Exists: If there is an existing route for the selected operator on the scheduled date, the visit will be added to the list of visits for that route.
If a Route Does Not Exist: If no route exists for the selected operator on the scheduled date, a new route will be created, and the visit will be added to this newly created route.
Re-assign a Route
To re-assign a route to another operator or engineer:
Select the Route: Ensure you have selected the route you wish to re-assign.
Access Update Options: Click on “Menu” and then select ‘Update Selected Route’.
Update Route Details: The Update Route prompt box will appear. Here, you can:
Update the Operator/Engineer assigned to the route.
Change the Scheduled Date for the route.
Optionally set the Start Location, End Location, and Stock Location.
Note: Start, End, and Stock Locations are not mandatory fields but are useful for tracking stock movements, especially if you need to monitor stock from a van to a machine.
Save Changes: Click on Update to apply the changes to the selected route.
Quick Tip
A Default Location must be assigned to each operator. This location will be used as the Stock Location by default unless it is manually changed during the route update process through the ‘Update Selected Route’ option.
Re-assigning Multiple Visits within a Route
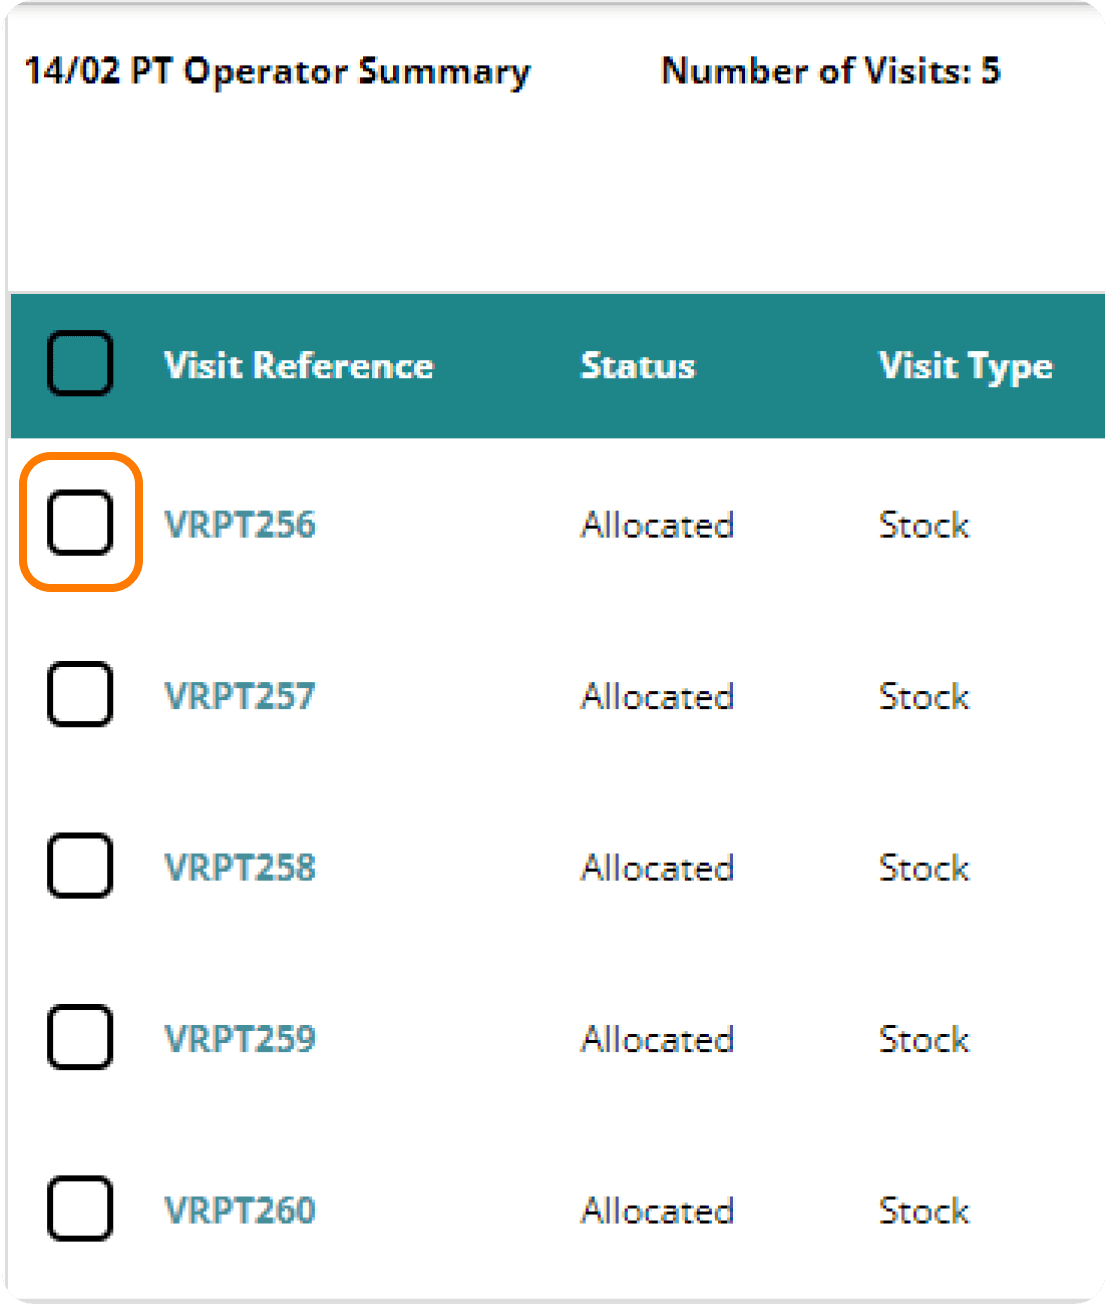
To update multiple visits within a route, select the checkboxes next to each visit you wish to update. Once the visits are selected, you can apply the desired changes to all of the chosen visits.

When a visit is selected, a green tick mark will appear in the checkbox next to it. You can then either:
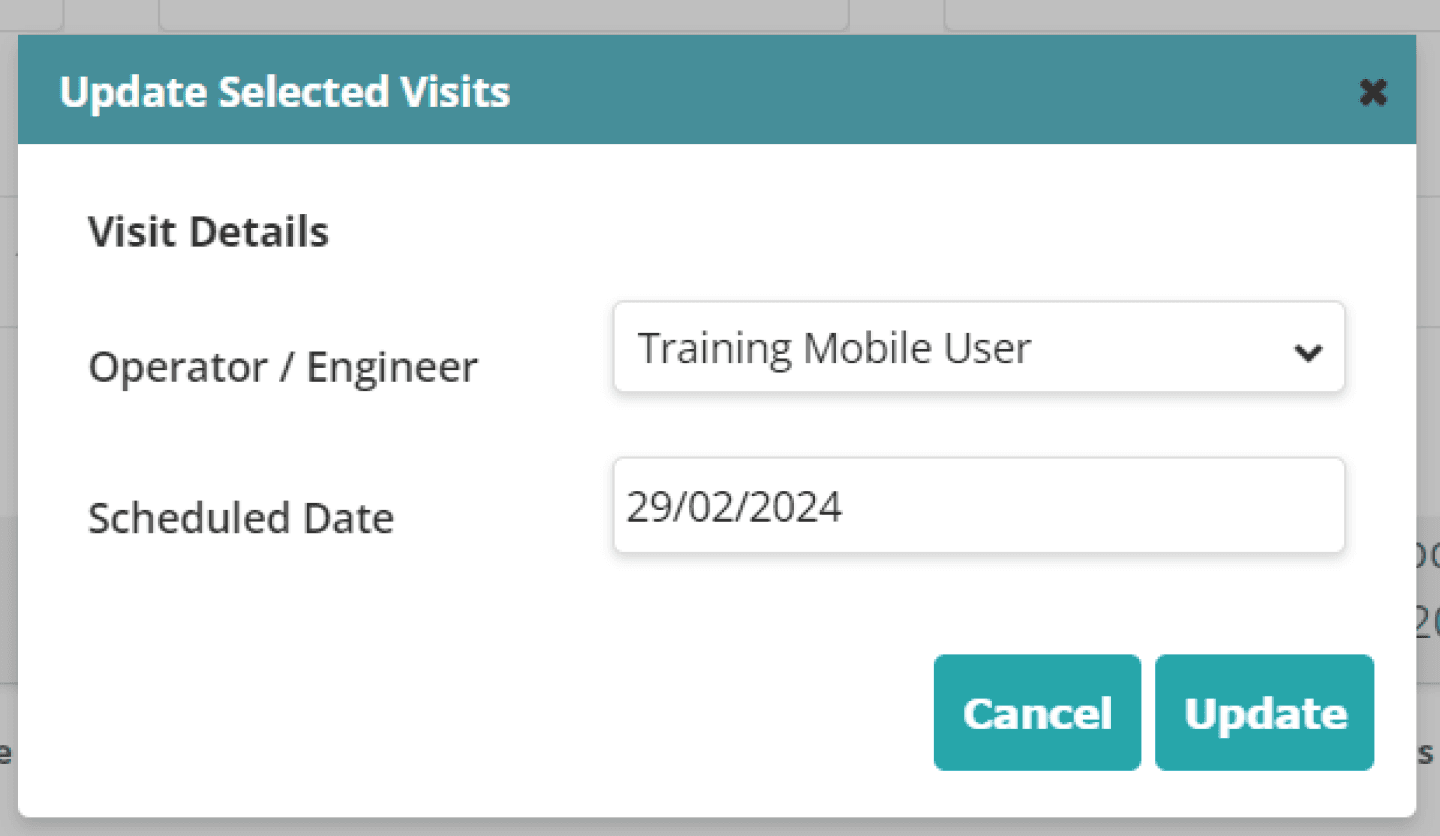
Update: To amend the scheduled date or the operator attending the visit, select “Menu” and then “Update Selected Visits.” You'll need to specify the new Operator/Engineer and Scheduled Date. After making your changes, select ‘Update’ to apply them. If you decide not to proceed with the update, select ‘Cancel,’ and no changes will be made.
Cancel: To remove selected visits, choose “Menu” and then “Cancel Selected Visits.”
Make sure to confirm your actions to ensure the updates or cancellations are correctly applied.

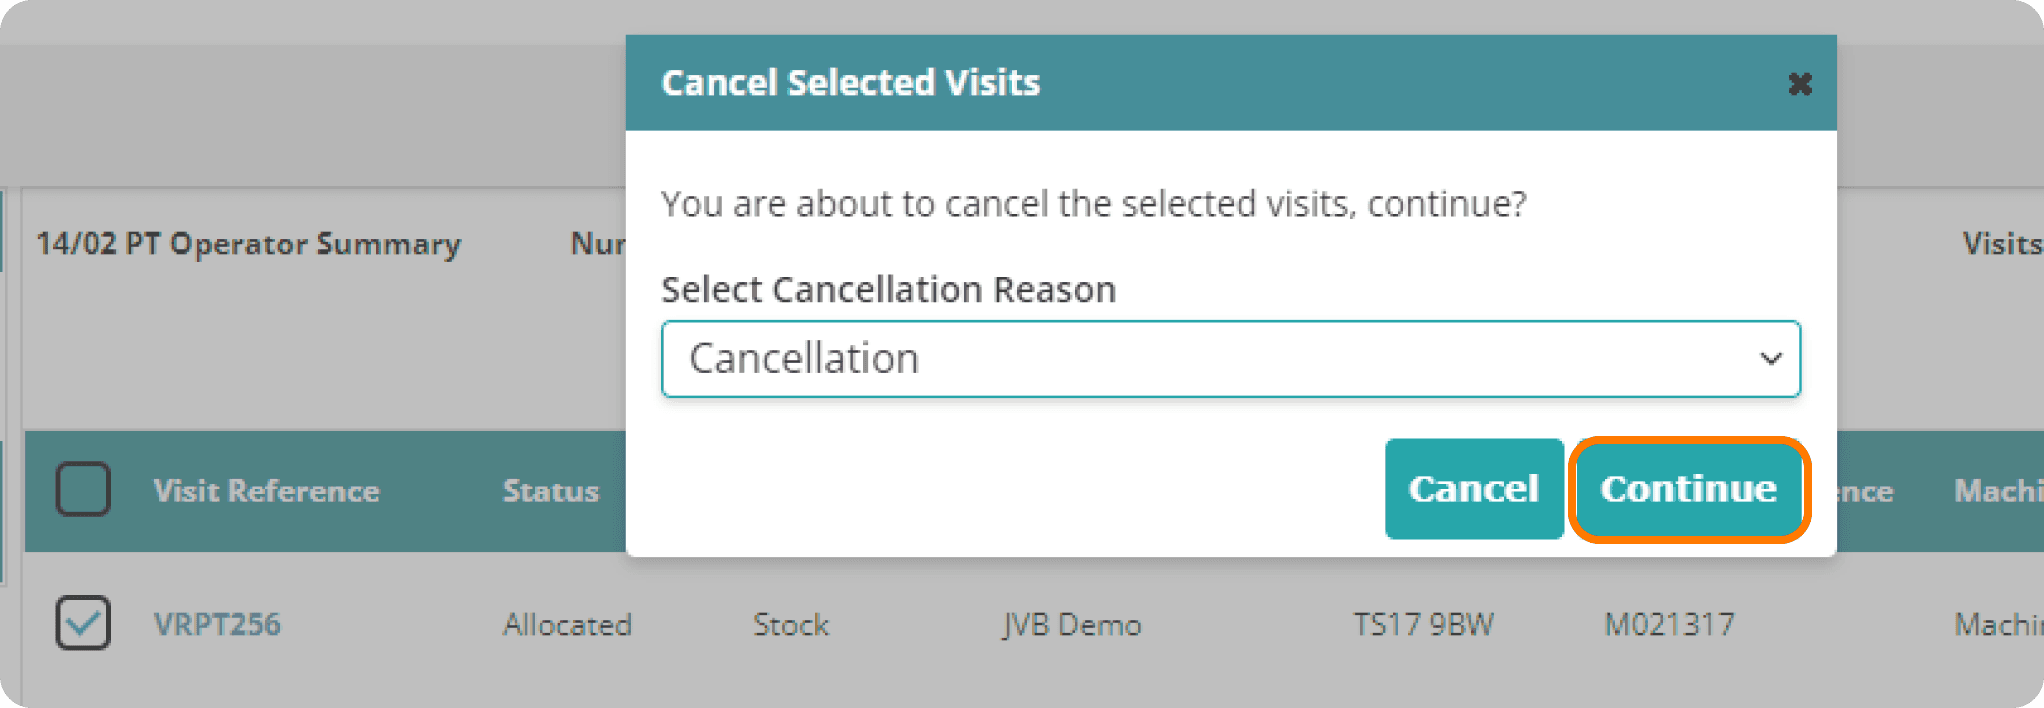
To cancel the selected visits, follow these steps:
Select a Cancellation Reason: Choose a reason for cancelling the visits from the provided options.
Confirm Cancellation: After selecting a cancellation reason, click ‘Continue’ to finalise the cancellation. The visits will then be updated to a Cancelled status.
Change Your Mind: If you decide not to proceed with the cancellation, select ‘Cancel’ to close the prompt without making any changes.
Quick Tip
Navigating away from the route with selected visits will automatically deselect any visits you had previously selected.
View Visit Sheet
To view a visit sheet, select the hyperlinked “Visit Reference,” which will take you to the visit sheet for that machine.
For uncompleted visit sheets, you can amend the Visit Reference field as needed. Any changes made will trigger a ‘Save Changes’ button to appear on the right-hand side.
For completed visit sheets, the Visit Reference field cannot be updated.
Update Uncompleted Visit Sheet
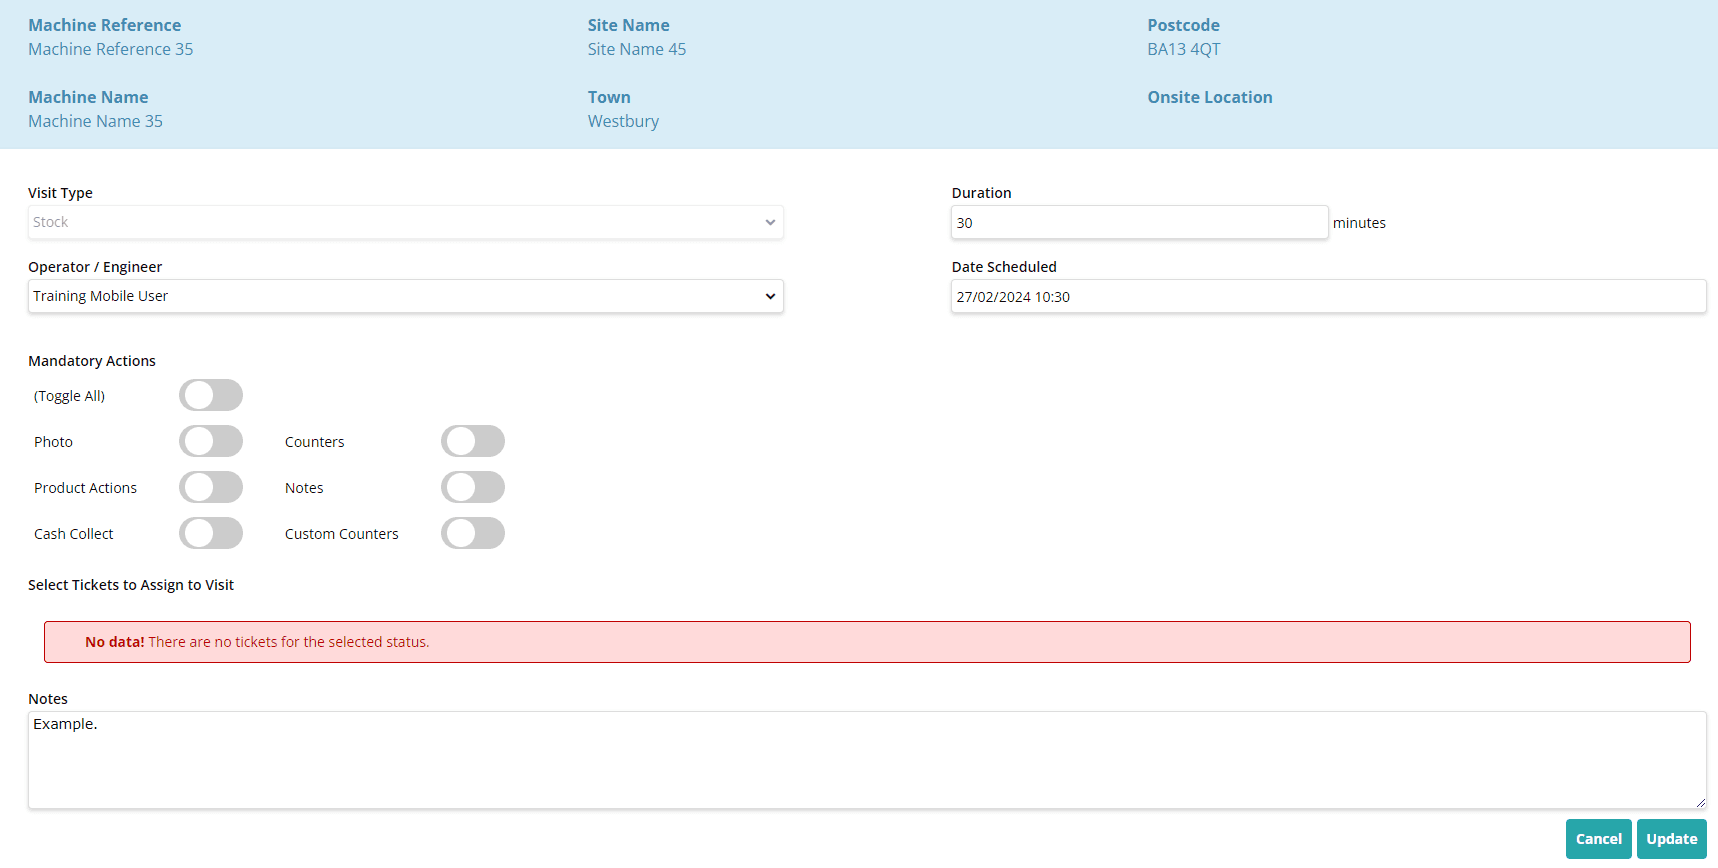
When a visit sheet is created, you may need to update the visit details, such as rescheduling the visit or changing the assigned operator.
To update these details on an uncompleted visit sheet, select ‘Update Visit Details’.
For Stock Visits:
Select the Operator who will handle the visit.
Choose any Mandatory Actions that need to be completed during the visit.
Note: If using machine/location templates instead of planograms, do not select products as mandatory, as this would require operators to enter values for all products.
Enter the Duration expected for the visit.
Select any Tickets that should be resolved during the visit.
Input the Scheduled Date for the visit.
Add any relevant Notes.
Click "Update".
For Service Visits:
Select the Operator assigned to the visit.
Enter the Scheduled Date for the visit.
Choose any Tickets that need resolution during the visit.
Add any relevant Notes.
Click "Update".
For Ad-hoc Visits:
Select the Operator who will handle the visit.
Enter the Scheduled Date for the visit.
Add any relevant Notes.
Click "Update".
To cancel a visit from the Update Visit screen:
Select ‘Cancel’ at the bottom of the screen. This will open a prompt.
Choose a Cancellation Reason from the provided options in the prompt.
Select ‘Continue’ to submit the visit as cancelled.
Once you confirm, the visit will be marked as cancelled, and you will be returned to the previous screen with the visit status updated.
Quick Tip
As a Owner or above, you have the ability to decide how uncompleted visits are handled at the end of the day, within Manage Account → System Configuration → Client Settings, there is a ‘Uncompleted Visit’ setting, and you can update this setting to be either:
Cancelled
All uncompleted visits will be cancelled, with the status being updated to ‘Cancelled’, and within the visit sheet there will be a note confirming that the visit was not completed on the original route date, and the visit has been cancelled via automation
Carried Over
All uncompleted visits will be carried over to the next day, with the status being updated to ‘Carried Over’, and within the visit sheet there will be a note confirming that the visit was not completed on the original route date, and the visit has been carried over.
Completed
All uncompleted visits will be completed, with the status being updated to ‘Completed’, and within the visit sheet there will be a note confirming that the visit was not completed on the original route date, and the visit has been completed via automation.
Moved to Action Required
All uncompleted visits will be moved to Action Required, with the status being updated to ‘On Hold’, and within the visit sheet there will be a note confirming that the visit was not completed on the original route date, and requires further action.


